Saturday, June 11, 2011

Khador vs Retribution: pRayvn vs pButcher

Jay and I met for another game of Warmachine over lunch yesterday.  We both tweaked our lists trying to guess what the other would be bringing.

pRayvn (I'm guessing it was the prime version but not sure)
Sentinals + UA
2 Griffon Light Jacks
Mage Hunter Assassin

From my recent emails to the group, Jay predicted I was going 'Jack heavy and brought an all melee list.  Iron Sentinals made up his infantry.  His plan was to use the Mage Hunter Assassin and the two Griffons to flank around and pressure Butcher.

pButcher
Juggernaut
Wardog
Kayazy Assassins (max + UA)
Yuri the Axe

The last time we met, I went against a Retribution force that ignored Line of Sight and could see through concealment.  I expected Jay to try that list again so I brought something different.  I brought fast units with the Kayazy and Yuri, both having stealth.  So even if he could bypass LOS he would still have trouble spotting stealth.  My plan was to race the Kayazy up and pressure the Caster with a Kill Stroke threat.  I also wanted to use Yuri to flank around and threaten an assassination.  If that wasn't possible I would send him in to Thresher infantry.  Butcher would walk up the field as usual and go for an end game win.

Deployment

Jay won the roll and elected to go second so I deployed Kayazy in the center with Juggernaut on their left and Butcher and the Dog next to him.  The battlefield had an open center; perfect for my Kayazy and marching army. 

Jay deployed towards my right stacked all together with his Light 'Jacks on the outside of the formation and Rayvn in the middle of the infantry. 

I deployed Yuri on the far left ready to storm down the flank.  Jay forgot to deploy his Mage Hunter Assassin :0


Deployment
Turn 1

Khador 1 2 3 go!  Everyone runs.  Kayazy spread out (habit) and run for the center.  Juggernaut follows on the left with Butcher and the Dog behind.  Yuri moves down the flank, threatening the left of the Ret infantry line.  Oh wait...

Rayvn and the Sentinals boost the left Griffon which allows him to move before activating.  This gave him a bigger threat range than I anticipated and the Griffon smashes into Yuri killing him.  There goes my flank!  The rest of the Ret force moves up to the wall and the other Griffon eyes the other flank.  Not a good start for me.

End of Turn 1
Turn 2

I spent some time here thinking about what the Assassins should do.  It looked like only one or two would make a charge and I'd face a big counter charge on the next turn by the Sentinals backed up by Rayvn.  This is when Jay gave me the advice of the game: "How about pulling back and waiting?"  I liked the sound of that. 

Butcher moves up and casts Fury on the Kayazy as they shift left and fall back.  One of the Assassins charges the Griffon on the left but misses his attack.  Juggernaut stays where he is. 

At this point I realize my infantry is more mobile (Kayazy SPD 6 vs Sentinals SPD 5) so shifting position seems okay.  I didn't like assaulting over that wall so I try to put some pressure on the left and take out the Griffon.   

Jay brings the Sentinals out running to the aid of the Griffon.  He keeps them in groups of three which I thought was a very cool tactic as when they are B2B (base to base) they get an armor bonus.  Rayvn goes with the Sentinals.  The Griffon on the right rounds the wall threatening my right while the one on the left attacks the Assassin but misses two attacks.  Rayvn casts Vortex of Distruction, allowing friendlies in her control range to get boosted attack and damage rolls in melee (I could be wrong though but it's something like that). 

Jay realizes that he forgot to deploy his Mage Hunter Assassin and brings him in on the left behind the Salt and Pepper towers.  He runs him deep on my left looking for his angle on the Butcher.   


End of Turn 2

Turn 3

Time for the Kayazy to show their mettle!  The two Assassins on the left slip off the Griffon and run past the Sentinals reaching the back of the Ret formation!  The rest run across the field and engage all of Jay's infantry.  Some Assassins are outnumbered 2-1 and it is a sight to see.  Both Griffons are tied up and the Assassin Leader and the Underboss are behind the front line trying to keep safe.  The rest of my force move up ready for a second wave hit.  On my next turn I'm threatening Kill Stroke with my Assassins and the Juggernaut and Butcher are in charge range. 

Jay spends a long time thinking about his next moves.  He has to neutralize all of my threats and get his guys in position for a counter attack.  Rayvn activates and dances through the Sentinals killing the Assassin Leader and then moves to kill the UA.  Without him I won't be able to Kill Stroke.  Rayvn attacks and the Underboss takes full damage.  He Toughs.  She attacks again and from the ground the Underboss Toughs again!  Still with attacks Rayvn goes for another hit and this time the Underboss goes down.  Kill Stroke neutralized.  Rayvn falls back over the wall.  But even without Kill Stroke, my Assassins can still advance into Rayvn so Jay has to take care of them.  Sentinals activate.  Three charge a lone Assassin on the right but all three miss their attacks (Assassins sitting at DEF 19 in melee!).  The Griffon on the right decides to take a free strike instead of trying to hit the Assassin and takes some damage but runs down the right and gets really close to Butcher. 

On the left, the Mage Hunter Assassin is weary of Butcher's Dog and advances just outside of the Dog's counter-charge range ready to attack next turn.

The rest of the Sentials take swings and most of them miss (needing something like 12s on three dice).  The two Sentinals fighting the Assassins in the backfield miss and even the other Griffon who gets a backstrike bonus misses.  After the dust settled, I lost half of my Assassins which is pretty remarkable.  They're amazing in melee and never before have I seen what they can really do.  

Rayvn unleashed a heroic attack killing the Underboss and taking away Kill Stroke.  The Sentinals along with a Griffon rallied next to their Caster blocking charge lanes for my Assassins.  It was epic!  But there was still an opening left to Khador and one threat left on the board-- Butcher.


Turn 4

Butcher keeps all of his focus and charges across the field reaching Rayvn.  This is the moment.  I've got to win the game here.  Surrounded, Butcher feats and swings on the charge with weapon master doing 5D6 of damage.  With a mighty swing of Lola, Rayvn takes a massive hit and falls.  Butcher wins the day for Khador.

 
Definitely an intense and thrilling game to play.  I was really impressed with the Assassins.  They dodged so many attacks it was unbelievable.  My big lesson with them is if you can get them into melee against the right unit, wow, they can tie them up for a long time.  Also, with parry, you can slip away and run deeper into the opponents line, tying up more things and threatening the caster.  Not to mention you always have the threat of Kill Stroke.  With the Assassins, you also don't have to worry about taking a charge because they still have to hit them and when they do they are dead anyway, boosted dmg or not.  Sometimes it's good to charge but other times it might be best to run so you can get them tied up in melee.   

I have to keep track of threat ranges and make sure my guys are safe on the advance.  Sorry Yuri! 

Another thing was the Dog-- defenitely did a good job of making the Ret flankers think twice before getting close to Butcher.

The final thing I learned and wanted to note was Jay's golden advice--"falling back and waiting."  I've never really done that before with Khador and this game showed me that it can payoff to be patient.  If things don't look like it's in your favor, fall back, shift and wait for a more desirable position; then when the time is right strike and strike hard.  Thanks for that Jay, and thanks again for another great game!  Looking forward to our next match.  Will be tweaking my list ^^  

Kayazy Assassin Conversion: Before the Primer

Just showing what he looked like before I sprayed the primer.  Forgot to mention that I use house spackle to hide some of the spaces between the cork and to put a slight hill before adding the dirt.

Kayazy Assassin Conversion

Worked on another conversion of a Kayazy Assassin.  This guy will most likely be my leader as he was the first one I finished and I also dig the basing.  Hood, mask, cloak, waist pouch, and backpack gas container are all custom sculpting work.  Tube for the mask is a guitar string.

The base was done with cork.  The bricks were sculpted with procreate putty (took a long time...).  The fence was super-glued together using Privateer Press's thin "pinning" wire.  I used a plastic tube for the iron rod coming out of the ground-- got it in a pack from Gale Force 9.  Ground work was super glue with real dirt thrown on.  Super glue binds dirt really well surprisingly.  After you get the dirt on you can put more super glue to seal it even more.  Just be sure you use ventillation as the super glue fumes can be quite strong.

Wednesday, June 8, 2011

pButcher vs pNemo

Khador vs Cygnar @ 35 points.  Ben is my Warmachine buddy and tonight played in his second game bringing pNemo to the table.  He was running:

pNemo
Thunderhead
Hunter
Thorn
Charger
Junior Warcaster
Arlan Strangeways
Black 13th
Squire

I was running Khador with:

pButcher
Juggernaut
Marauder
Kodiak
Wardog
Great Bears of Gallowswood
Kayazy Assassins (max)
Kayazy Assassins Underboss
Battle Mechaniks (6)

I won the roll and chose to go second so I could react to Ben's deployment.

Ben contemplating his deployment

He put the Thunderhead on the front line along with the Thorn all set to arc node and the Charger.  On the back line, Arlan and the Hunter were on the left, Nemo, the Squire and JR in the middle with the B13 on the right. 

I put my three 'jacks in the center with mechaniks behind them.  Bears, Butcher, and the Dog are behind the Mechaniks and the Assassins on the right. 

My plan is to run the Assassins forward to tarpit and engage the Cygnar front while my big hitters run up behind as a second wave.   
Deployment
Turn 1 the B13 move to the wall and get Arcane Shield from Junior.  Thunderhead and the front Light 'Jacks move up.  Disruption Field goes on the Thunderhead.  Electrify goes on the Hunter as it runs up to the palm tree. 

Khador responds by running like mad.  Assassins take the center with Iron Flesh.

End of Turn 1
Ben gets his AOEs ready and the B13 leap over the wall and shoot the Fire Beacon at the Kayazy hoping to expose their stealth but miss!  It lands right in front of them.  Ryan (of B13) shoots Mage Storm which also misses and scatters in front of the Kayazy right next to the Fire Beacon.

The rest of Ben's forces move up but he forgets to attack with his Thunderhead!

Mage Storm vanishes and the Kayazy run forward.  Three manage to engage the Hunter, Thorn, and the Charger.  The rest of the Khador force runs up behind.


End of Turn 2
With the Khador tide getting closer to his lines, Ben sets up a devestating attack.  Arlan uses his special to pull the Thorn out of melee, freeing up Nemo's arc node and allowing him to conjure up Chain Lightning on an Assassin.  It misses!  Needing to roll 10s he goes for another Chain Lightning and rolls a hit!  A bolt strikes an Assassin and arcs to two more killing all of them.  Nemo follows up casting Locomotion on the Hunter moving him back 1 inch, avoiding free strikes with parry.

B13 take aim and strike with Mage Storm and kill A LOT OF DUDES.  Another B13 snipes an Assassin.  The last shoots at another Assassin but it misses and hits the Charger but luckily does no damage.

Ben sensing that the Thunderhead was in danger backs it up to safety and blasts the Juggernaut as the Assassins charge.

One charges into the Hunter and cripples his melee arm.  Another runs behind the Juggernaut and reaches Ryan (of Mage Storm fame) but wiffs on his attack.  The Kodiak runs up to help and ties up Ryan in melee.

Great Bears run forward.  Butcher gets Iron Flesh going to 19 DEF and the Marauder runs up with Mechaniks behind after making a lot of repairs on the Juggernaut.     

At this point I'm getting ready charge with my second wave.  I'm pretty surprised that I have Assassins left.  One thing that I've got going for me is I have all of my heavy hitters left-- 3 'jacks, Great Bears, and Butcher sitting with Iron Flesh and Focus and the Dog.  Just gotta reach his line!


End of Turn 3
This is the big turn 4.  B13 abandon Ryan for dead and retreat but not before taking a shot at the Kodiak.  It takes some light damage followed by Mage Storm from Ryan.  The blast doesn't penetrate the Kodiak's armor but it kills the Assassin. 

Meanwhile on the left flank, Arlan repairs the Hunter as the Charger lights up the Juggernaut crippling his left arm and his movement.

Thorn falls back and Butcher sees the Thunderhead advancing right into their formation.  "Here it comes!!"  The Thunderhead attacks with his Pulse Special killing the rest of the assassins.  The Juggernaut crumbles to the ground as the shockwave hits the Great Bears.  Kolsk takes a hit and TOUGHS!  Volkov braces against the impact, stumbles, and TOUGHS!  He turns to see Yarovich hit by the mighty blast.  TOUGHS!!!  Ben eyes go wide and immediately darts back, "That's Bull $#!7!!!!"

Butcher senses that this is the time for a little Blood Frenzy!  And now with fire in their eyes the Great Bears charge!!!  Kolsk reaches the Hunter and misses his first swing.  He comes around again for a second hit and nails the Hunter for crippling damage.  Volkov and Yarovich hit the Thunderhead HARD crippling first the Thunderhead's cortex then it's movement.

The Marauder charges into the Thunderhead, eyeing the Hunter behind him.  Rolling with Full Throttle, the Marauder hits his Combo Smite and smashes the Thunderhead back, wrecking it completely.  It lands just shy of colliding with the Hunter.

The Kodiak looks down and sees Ryan, her gun still smoking from her last Mage Storm shot.  He swings with his fist and finally takes her down.


End of Turn 4
Still with a lot of fight Ben activates the B13.  They take a shot at Kolsk on the left.  He toughs!  Ben responds quickly with another, "That's Bull$#!7!!!"  Lynch takes a shot at Yarovich and this time, Yarovich falls.

Arlan quickly repairs the Hunter getting its gun back online.  The Hunter parries away from the annoying Kolsk and shoots Butcher with a boosted attack.  Misses.  Damn.  Dice -12.  Ben says, "It's over Prime..."  (Megatron quote)

Charger charges forward and hits the two Bears in the middle taking out both Yarovich and Volkov.

But then things start to unravel for Ben.  His Junior Warcaster with Rat 4 misses Kolsk.  Nemo Feats and misses the attack on the Marauder.  He Chain Lightning attacks the Wardog hoping to bring down Butchers DEF but at dice -4, rolls a 4 for no damage.  And with that, Ben concedes the game.  GG Ben!!

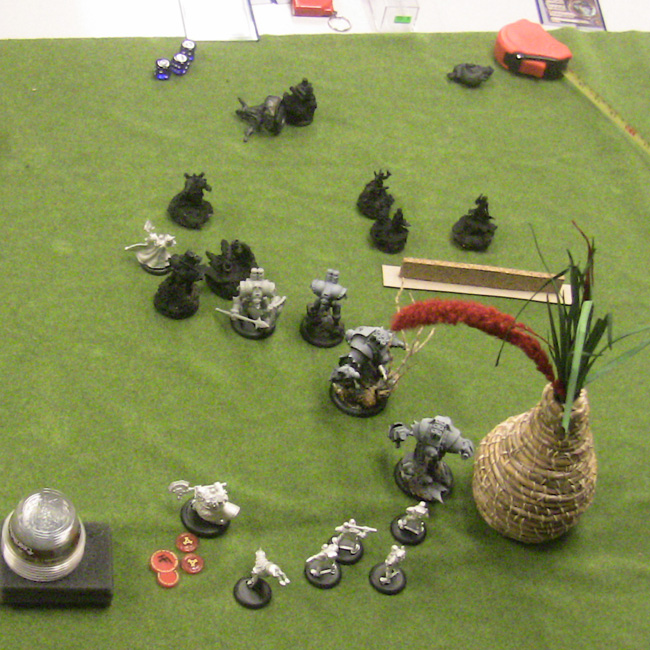
Position at End of Game
After 5 hours of playing, our epic match finally game to an end.  Afterwards, we both said that the turning point was the tough rolls made by the Great Bears.  Oh they are legendary.  It allowed them to stay alive and charge the Thunderhead on the next turn.  Without that, we weren't sure if the Marauder would have been able to finish the Thunderhead off.

This is the first time that I've seen the greatness of the Bears and wow, if you can get them into melee, they can wreck a lot of face.  You can't really count on the tough rolls but when the dice are on your side it can turn the tide of the game.

In the initial turns, it looked really grim for Khador with two huge AOEs being put down not to mention the threat of the Thunderhead's Pulse Attack.

But the Juggernaut, for some reason, soaked up a ton of damage and the Assassins did what they were supposed to do and allowed everyone behind them to clash with the Cygnar line.  Butcher was also able to enter the End Game relatively untouched and ready to do what he does best-- be crazy scary.

We both had a blast with this game and we'll both be tweaking our lists for the eventual rematch.  Some things I learned from this game:

-Feels like 3 Jacks might be too much.  Besides the big Combo Smite, the Marauder and Kodiak didn't do too much.  I might need just one of them.  Instead of the Marauder, I'm thinking of brining in Yuri, a Manhunter, and Widowmakers.  That'll give me some fast flankers to go along with my slow advance; Yuri and the Manhunter hopefully being able to hunt solos and be a distraction.  The widowmakers will also give me some range and more options to hit solos.  I could also bring in a calvary solo instead of the Widowmakers which sounds like fun.  But I do feel I need something fast along the flanks to give me more tactical options.  Right now all I can do is pretty much slow advance-- Assassins in front, Heavies behind.      

-My Mechaniks always get left behind after a repair.  I might have to stagger them up the field, to prepare for future repairs. 

-Combo Smite is REALLY POWERFUL.  The Marauder's basic attacks aren't too bad either hitting at P+S 16s.  Haven't really used the Kodiak's throw but right now I'm leaning to the Marauder. 

-Juggernaut always takes concentrated fire as the army advances.  Just before he reaches the lines, he gets destroyed.  Phillip says he gets attacked because he's the only one painted lol. 

-Kayazy Assassins.  Love this unit and can see myself using them for a while.  So many things they can do from tarpiting, being monsters in melee, hard to hit, and they also have assassination possibilities with Kill Stroke. 

My next list might be this:

pButcher
Juggernaut
Marauder
Wardog
Great Bears
min Mechaniks
Widowmakers
Yuri the Axe
Man Hunter

Monday, June 6, 2011

Khador Marauder Basing and Conversion

Used cork, real dirt, twigs I found outside.  The tree is very delicate and I broke it once already when something fell on it TT. 

Did a conversion on his foot.  The heel separates and a piston drives the hell into the ground to give the Marauder more stability as he fires his Combo Smite special attack. 


Saturday, June 4, 2011

Khador vs Retribution 15 pts


15 pts lunch game with Jay. 
Khador (me)
pButcher
Juggernaut
Marauder
Doggy
Widowmakers
Mechaniks (4)
Ret (Jay)
Ravyn
Hydra
Mage Hunter Strike Force (max)
Mage Hunter Commander
Mage Hunter Assassin
Off the bat I learn that his Mage Hunters can ignore LOS and basically shoot through anything and has stealth.  This could be really bad.  I win the roll and elect to go first thinking that if I go second I might get destroyed on turn 1. 
We played on two square tables so the field was a little bit smaller than normal but a good size for 15 points.  Terrain has three ruined buildings in the center of the board and we each have a stone wall near our deployment zones.  I deploy with my guys stacking the right side.  Butcher and the Dog have the middle with the Juggernaut and Marauder to his right.  Mechaniks are on the right of the jacks.  
Jay deploys Rayvn in the FAR opposite corner with the Hydra nearby.
Widowmakers deploy next to Butcher.  Didn't know quite where to put them as they won't have cover from the Mage Hunters and won't be able to hit anything because of stealth. 
Jay advance deploys the Mage Hunters behind his wall directly in front of my guys. 
After deployment I get a big lump in my throat.  My warjacks have so far to run to reach the Ret force.  My widowmakers can't hit anything and my army has nowhere to hide.  My plan is to run and hopefully survive the hail of gunfire that is coming and reach their lines.
Turn 1 everyone runs.  The widowmakers could have gone far ahead but I keep them next to Butcher.  Subconsiously I didn't want them out in the open and I'm thinking they will draw some of the fire away from the rest of the army.
Jay concentrates fire on the Juggernaut blowing its movement and doing quite a bit of damage.  He sends his Assassin down my left flank.  Widowmakers get taken out leaving only 1 or 2 left.
Butcher gives a nod to the Mechaniks, "you know what to do."  They activate and run to the Juggernaut desperately needing to fix his movement.  Can't stay out in the open!  In my games so far, the mechaniks have only managed to do repairs for 1 point each but this time they repair for 11 points total!  Movement is repaired and also some boxes near the cortex.  Juggernaut and Marauder run forward about halfway now to the Mage Hunter gunline.  Butcher, his Dog, and the lone Widowmaker run up.
Rayvn pops feat and the Hydra closes in.  The Assassin runs to within striking distance of Butcher.  My last widowmaker falls and more concentrated fire on the Juggernaut.  Jay needing to roll 11's on three dice with the Mage Hunters is having trouble and my jacks soak up A LOT of hits.  It's amazing.  Still, the Juggernaut gets his open fist blown off.  Mechaniks are trying to catch up.
Butcher charges the Assassin and kills him but he's now in the open.  His dog runs to his side.  My jacks reach the wall protecting the Mage Hunters.  Picture this: Juggernaut going left, Marauder going right, both trying to get around the wall.  They reach the outer edge of the gunline running into melee with some Mage Hunters.  Next turn I'm all set with some NASTY trample angles!
But everything unloads on the Juggernaut which was already severly damaged.  My loyal warjack finally crumbles to the ground.  A lone Mage Hunter that was engaged with the Marauder advances around him and goes for a Mechanik but misses. 
The Mage Hunters take aim at the Dog.  He dodges two attacks and takes a massive hit bringing him down to one box.  Another hit and the Dog makes his tough roll!!  The dog gets hit again but is unable to tough it out. 
Mage hunters fall back from the Marauder and Jay goes for the assaassination.  Rayvn casts Vortex of Destruction and charges in with Reach and unloads on the Butcher sitting at something like 21 armor.  After all her attacks, he escapes with minimal damage.  The Hydra charges Butcher with 3 focus.  Hydras gotta finish it.  Jay buys attacks and damage but leaves the Butcher with half life.  Turn goes to me and Jay realizes he made a critical error.  He forgot that the Hydra's damage could've been boosted with Vortex of Destruction. 
Butcher already in melee with Rayvn sits with 6 focus and uses it all to hit hard and win the game.  Had Jay used Vortex of Destruction with his Hydra, we both felt it would have been enough to bring down the Butcher. 
A very entertaining and dramatic game and as always I learned a lot:
-against that particular list, widowmakers... yikes.  They can't hit anything really because of stealth and they have no cover from the Mage Hunters.  I hear that a Spriggan might be able to give them targets with the flare? 
-Jacks running at the Mage Hunters can soak up A LOT of damage.  With POW 10 Jay needed 11s on three dice to do damage and it was hard to come by.  Mechaniks behind the jacks helped a lot too.
-In this situation, better to deploy in the center then on the flanks.  Shorter distance to run and get into melee.
-next time I'm thinking of Assassins of my own ^^.  Kayazy have stealth, are fast, with high DEF and can hopefully tie up the enemy until my jacks and Butcher reach them.
-Beast 09 would be sick too.  His ability to advance after getting shot plus Thresher would be good against all that infantry.  But for now I'm going to stick with my three-- Juggernaut, Kodiak, and Marauder; still want to get a feel for what they can do.  I want my Kodiak to throw something so badly. 

Wednesday, June 1, 2011

Used watch parts last night to add some details to my Juggernaut.  Even my wife says it looks so much cooler ^^  Eventually I want to get her Canon camera working again so I can take pictures easily. 

Buying some Widowmakers from Monte tomorrow and after reading about them, I think they will make a good addition to my army.  They seem to be very versatile and now I'll have a way to hunt pesky solos that always hang around the flanks. 

Still got only the Juggernaut painted.  When I have some free time I want to paint a Kayazy Assassin.  On the to-do-list is:

-Put together and mod the Kodiak.
-mod the Marauder
-finish sculpting and basing the assassins
-sculpt War Dog into a Husky (can't wait for that one)

There's still other things to do; too many to list. 

Found a great gaming club and a cool bunch of guys.  Makes the game that much more enjoyable.